ePokratis MedAiConnect Android Manual – Device Pairing, Vital Sign Monitoring & AI Wellness Features

Instructions for Use and Bluetooth Activation for Blood Pressure Monitor, Scale, Thermometer, Fingertip Pulse Oximeter, and Portable ECG Monitor

  1. Turn on the Device: Activate the device (Blood Pressure Monitor, Digital Weight Scale, Non-Contact Forehead Thermometer, Fingertip Pulse Oximeter, Portable ECG Monitor) to initiate a measurement, which will automatically enable Bluetooth mode.
  2. Ensure Proximity: Keep the device close to your mobile phone for optimal Bluetooth range.
    • Blood Pressure Monitor: Wait for the measurement to complete and stabilize. The device's Bluetooth will then be ready to pair with your phone.
    • Digital Weight Scale: Step onto the scale for a weight reading. Once the value stabilizes, the blinking Bluetooth icon indicates readiness for pairing.
    • Non-Contact Forehead Thermometer: Remove the sensor cap, position it near your forehead, and press the power button. After taking the measurement, Bluetooth mode activates, ready for connection.
      Note: Temperature readings are displayed in Celsius within the ePokratis MedAiConnect app, even if the device is set to Fahrenheit, using internal conversion.
    • Fingertip Pulse Oximeter: Tap the power button to activate the device and place your finger on it. Wait for the readings to appear on the oximeter. The device's Bluetooth will then be ready to pair with your phone.
    • Portable ECG Monitor: Press and hold the power button to turn on the device. Position the top sensors near your wrist or heart. After approximately 10 seconds, the readings will appear on the screen, and Bluetooth will be enabled for connection.

Measurement Instructions for Ketone, Lactate, Uric Acid, Total Cholesterol, and Glucose Using the Multi-Functional Monitoring System

Preparation Steps

  1. Switch Off the Device:
    • Ensure the medical device is off by pressing and holding the M button for a couple of seconds.
  2. Insert the Code Chip (Not Applicable for Glucose Measurements):
    • For Ketone, Lactate, Uric Acid, and Total Cholesterol measurements, insert the corresponding code chip into the device. Wait until the code number on the chip appears on the screen.
      • Note: The glucose test has a universal code pre-installed, so no code chip is required for glucose measurements.
    • For every vial of Ketone, Lactate, Uric Acid, and Total Cholesterol test strips, there is an associated code chip that must be used to ensure compatibility.
    • Ensure the code chip is compatible with the test strip to avoid errors:
      • E-8 Error: Incorrect code chip or incompatible test strip.
      • E-2 Error: Expired code chip or test strip.
      • E-U Error: Used test strip inserted.
    • The device is now calibrated and ready for the specific test.

  3. Remove the Code Chip:
    • Press the top button to eject the code chip. The device will automatically power off.

Blood Test Procedure

  1. Insert the Test Strip:
    • Insert the corresponding test strip for the desired measurement (Ketone, Lactate, Uric Acid, Total Cholesterol, or Glucose) into the device. This will power on the device and display the relevant parameter on the screen:
      • "GLU" for glucose
      • "KET" for ketone
      • "CHOL" for total cholesterol
      • "UA" for uric acid
      • "LAC" for lactate

  2. Obtain a Blood Sample:
    • Use a sterile lancet to puncture the fingertip or chosen site.
    • Wipe off the first drop of blood and gently squeeze the site to obtain another drop.
    • Apply the blood sample to the absorbent hole of the test strip at a tilted angle. Ensure the confirmation window on the strip is completely filled.

      Important Notes:
      • Do not smear the blood sample.
      • Always apply the blood sample after inserting the test strip.
      • If no blood is applied within 3 minutes, the device will automatically turn off. Remove and reinsert the test strip to restart the test.
      • Never add additional blood to the test strip once testing has begun. Discard the used strip and start a new test if required.

  3. Wait for the Results:
    • The device will count down to 0 (times vary by test type) and display the results on the screen:
      • Glucose: ~5 seconds
      • Ketone: ~10 seconds
      • Total Cholesterol: ~60 seconds
      • Uric Acid: ~15 seconds
      • Lactate: ~5 seconds


Post-Test Steps

  1. Store the Results:
    • The test result is automatically saved in the device's memory for future review.
  2. Eject the Test Strip:
    • Use the eject button to safely remove the used test strip. Dispose of it in accordance with local biohazard regulations.
    • Upon ejecting the test strip, the device enables Bluetooth pairing mode:
      • Flashing Blue: Indicates the Bluetooth function is on and waiting for connection.
  3. Bluetooth Data Transfer:
    • Observe the Bluetooth indicator:
      • Flashing Blue: The device is ready to pair.
      • Solid Blue: The connection is established.

Retrieving Stored Readings from the Device's Memory

  1. Enter Memory Mode:
    • Start with the device turned off.
    • Press and release the M button. The device will power on and automatically enter memory mode, displaying the most recent test result along with the date, time, and measurement type.
  2. Navigate Through Stored Readings:
    • While in memory mode, use the Right Arrow (►) button to scroll through older readings.
    • Use the Left Arrow (◄) button to navigate back to more recent readings.
    • The following indicators will appear:
      • "toP": Indicates you have reached the latest (most recent) reading.
      • "End": Indicates you have reached the oldest stored reading.
  3. Exit Memory Mode:
    • To exit memory mode, press and hold the M button for 2–3 seconds.
    • Alternatively, the device will automatically power off after one minute of inactivity.
  4. Enable Bluetooth for Data Transfer:
    • To transfer stored readings via Bluetooth:
      • Press the Right Arrow (►) button twice while in memory mode. The screen will display "BLE" and the Bluetooth indicator will begin blinking blue, indicating readiness for pairing.

        Note: The device transmits one reading per session. To transfer another reading, turn off the device and repeat the process.


Important Notice:
After performing a blood test with the Multi-Functional Monitoring System, the specific measurement (e.g., ketone, glucose, uric acid, total cholesterol, lactate) can be transferred and saved in the ePokratis MedAiConnect app upon request. Once the transfer is complete, all data stored in the device's memory will be automatically deleted.

This deletion process applies in two cases:

  1. Transferring the latest reading immediately after a blood test.
  2. Retrieving stored measurements from the device's memory—in this case, the most recent stored reading for each selected category within the app (ketone, glucose, uric acid, total cholesterol, lactate) will be fetched before all data is deleted.

Please note that the transfer time may increase if multiple measurements are stored in the device. To optimize performance and ensure quicker future transfers, the device’s memory is cleared after each successful transfer, keeping the system ready for new readings.

Bluetooth Pairing Instructions Between Medical Device and Mobile Phone

  1. Bluetooth Pairing Request:
    • If the Bluetooth Pairing Request pop-up appears on your mobile phone as shown in the picture below, it means the medical device is prompting you to pair (this is generally expected to take place once).
  2. Locate the Six-Digit Pairing Code:
    • Find the six-digit Bluetooth pairing code located on the back of the medical device.
    • The code corresponds to the last six digits of the device's serial number, excluding the final checksum digit (which may be alphanumeric, A-Z or 0-9).
  3. Enter the Pairing Code:
    • Enter the six-digit code displayed on the back of the device into your mobile phone when prompted.
  4. Successful Pairing:
    • Once the code is entered, the Bluetooth pairing will be successfully established.

Pairing, Removing, or Replacing a Medical Device in the ePokratis MedAiConnect App

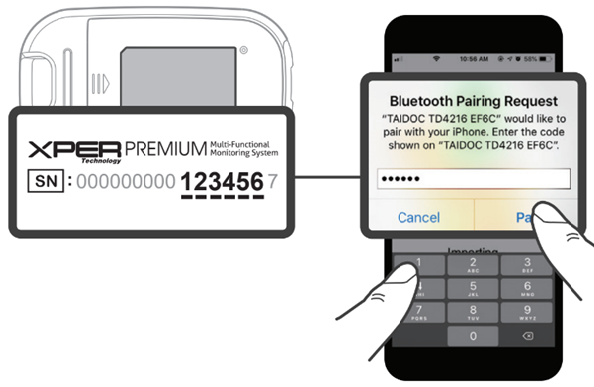
Pairing a Device for the First Time

  1. Open the ePokratis MedAiConnect app and navigate to the main view. Select "My Devices" located at the lower right of the screen.
  2. The Devices screen will open. If your mobile phone’s Bluetooth is off, a pop-up message will appear:

    "ePokratis MedAiConnect requests Bluetooth access to enable health measurement connectivity with your device."

     Tap "Allow" to enable Bluetooth.

  3. Tap "Retry scan" to trigger device detection. Once recognized by your mobile phone, the device will appear under "Add Devices" with a "Configure" button next to it.
    • Tap "Configure" to add the device to "Configured Devices". A toggle button will appear next to the device, indicating successful configuration.

      Note: Once configured, the device remains listed under "Configured Devices" for easy future access.

  4. Toggle the button next to the device under "Configured Devices" to complete Bluetooth pairing.
    • If you choose not to configure the device at this stage, you will be prompted to do so when accessing specific health measurement screens, e.g., the Blood Pressure, Weight, Temperature, Oximetry, ECG (to retrieve readings from the Portable ECG Monitor), Glucose, Ketone, Lactate, Cholesterol, or Uric Acid screen (see Retrieving Health Data).
    • On the respective screen, tap "Configure Device" to return to the Devices screen (Step 2). Once the device is recognized by your mobile phone, it will appear under "Add Devices" with the "Configure" button next to it. Tap "Configure" to complete the setup.

Removing a Configured Device

  1. Open the ePokratis MedAiConnect app and navigate to the main view. Tap "My Devices" at the lower right of the screen.
  2. The Devices screen will open. Under the "Configured Devices" section, locate the device you wish to remove.
  3. Tap the "Remove" button located underneath the toggle button for the specific device you intend to remove. Each device listed under "Configured Devices" has its own "Remove" button.
  4. Upon tapping "Remove," a confirmation pop-up will appear with the following message:

    Remove Device
    Are you sure you want to remove this configured device?
    You will need to reconfigure it if you wish to use it again later.

    Cancel
    | Remove

  5. Tap "Remove" to confirm. The device will be removed from "Configured Devices". To reconfigure the device later, ensure Bluetooth is active and tap "Retry scan". The device will then appear under "Add Devices".

Replacing an Existing Device with a New One (Same Model)

  1. Open the ePokratis MedAiConnect app and navigate to the main view. Tap "My Devices" at the lower right of the screen.
  2. The Devices screen will appear.
  3. Turn on your new medical device and ensure Bluetooth is activated. Then tap "Retry scan" — the new device will appear under the "Add Devices" section.
  4. If a device of the same model is already listed under "Configured Devices", tap the "Configure" button next to the new device appearing under "Add Devices". A confirmation pop-up will appear with the following message:

    Replacing a Device
    A device of the same model is already configured.
    Are you sure you want to continue configuring this new device?
    If you proceed, the previously configured device of this model will be removed and replaced by the new one.

    Cancel | Confirm

  5. To replace the existing device, tap "Confirm". The previous device will be removed from "Configured Devices", and the new device will take its place.

Retrieving Health Data

If Bluetooth is Paired (Toggle Activated)

  1. From the main view, go to "My Vitals" (heart icon) to open the Select Method screen.
  2. Tap "Medical Device" in the upper right and select either Blood Pressure, Weight, Temperature, Oximetry, ECG (to retrieve readings from the Portable ECG Monitor), Glucose, Ketone, Lactate, Cholesterol, or Uric Acid. You’ll be redirected to the respective screen.
  3. Tap "Add Vital Sign" at the bottom, then select "Retrieve and Save" in the pop-up to fetch and save the reading. Success messages, "Data retrieved" and "Data saved", will display. Tap "Close" to exit.

If Bluetooth is Not Paired (Toggle Not Activated)

  1. From the main view, go to "My Vitals" and repeat the steps above to reach the Blood Pressure, Weight, Temperature, Oximetry, ECG (to retrieve readings from the Portable ECG Monitor), Glucose, Ketone, Lactate, Cholesterol, or Uric Acid screen.
  2. Tap "Add Vital Sign" and then select "Connect" to initiate Bluetooth pairing. Once connected, the "Retrieve and Save" button will appear. Tap it to fetch and save the reading.
  3. Upon success, you’ll see "Data retrieved" and "Data saved" messages. Tap "Close" to finish.

Troubleshooting

Device not found, turned off, or malfunctioning

If the device is turned off, out of range, or malfunctioning, the following error message will appear:

"Device not found nearby, turned off, or may be malfunctioning. Please ensure it is powered on and placed close to your mobile phone. If the issue persists, consider replacing the device."

A "Retry" button will appear, allowing you to attempt reconnection once the device is powered on and within range.

How to Estimate Informational Wellness Indicators Using AI Technology

  1. Prepare Your Device:
    • Charge your phone: Ensure your battery level is above 30% and your phone is not in power-save mode.
    • Check your camera: Clean the front camera lens and ensure it’s free from scratches.
    • Position the phone: Hold your phone with the selfie camera at eye level and parallel to your face. To minimize shaking, use a stand or stable surface if possible.
  2. Choose the Right Environment:
    • Lighting: Find a spot with controlled lighting—avoid light sources directly behind or to the side of you. Do not position your phone where ceiling lights shine directly on the screen.
    • No direct sunlight: Make sure your face is evenly lit without direct sunlight or other reflective surfaces (mirrors, glass, etc.) in the frame. It's best to have only one light source facing you.
    • Avoid distractions: Ensure no one is moving behind you, and try to avoid areas with multiple light sources.
  3. Get Comfortable:
    • Seated posture: Sit comfortably with your feet flat on the floor and legs uncrossed.
  4. Relax Before Measuring:
    • Take a moment to relax before starting your AI wellness measurements.

Taking AI Wellness Measurements

  1. Hold the Phone Correctly:
    • Keep your phone upright at eye level to ensure optimal measurement.
  2. Frame Your Face:
    • Position your face within the cyclical frame on the screen. Ensure your face is fully visible and not covered by any hair, accessories, or clothing (such as hats, masks, or sunglasses).
  3. Stay Still:
    • Remain still during the measurement—avoid speaking, moving, or looking away from the screen. Stay relaxed until the measurements are complete.

Accessing the AI Wellness Indicators Screen in ePokratis MedAiConnect

Method 1

  1. Launch the Mobile App Open the ePokratis MedAiConnect app and go to the main screen.
  2. Navigate to AI Vital Signs Tap the "AI Vital Signs" button located at the bottom right of the main screen.

Method 2

  1. Launch the Mobile App Open the ePokratis MedAiConnect app and go to the main screen.
  2. Select Vital Signs Tap "Vital Signs" at the bottom left of the main screen.
  3. Navigate to AI Vital Signs Tap the "AI Vital Signs" button at the center bottom of the screen.

Technology Partnerships

CISCO
Hewlett Packard
Dell
Microsoft
vm ware

Participations in Clusters & Organizations

Be in the  loop!

Join our newsletter and get updated with the latest industry news.
Newsletter Form - EN